Create Flutter Login and Register Ui.
This tutorial is a step-by-step guide to building a Flutter app that integrates login and registration features.
Login and Register
In this tutorial, you will learn how to create a login and a register ui for a flutter project.
Complete Source Code
A main.dart file is a file in the Flutter framework that contains the logic for your app. It is the entry point for the application and is where you can define any variables you need to use in your code.
main.dart
import 'package:flutter/material.dart';
import 'package:loginuicolors/login.dart';
import 'package:loginuicolors/register.dart';

void main() {
  runApp(
      MaterialApp(
    debugShowCheckedModeBanner: false,
    home: LoginPage(),
    routes: {
      'register': (context) => RegisterPage(),
      'login': (context) => LoginPage(),
    },
  ));
}
This blog shares insights into the login page that's being built with Flutter. The login page will allow users to enter their username and password to authenticate before accessing the app.
import 'package:flutter/material.dart';
import 'package:loginuicolors/register.dart';

class LoginPage extends StatefulWidget {
  const LoginPage({Key? key}) : super(key: key);

  @override
  _LoginPageState createState() => _LoginPageState();
}

class _LoginPageState extends State {
  @override
  Widget build(BuildContext context) {
    return Container(
      decoration: BoxDecoration(
        image: DecorationImage(
            image: AssetImage('assets/rg.jpg'), fit: BoxFit.cover),
      ),
      child: Scaffold(
        backgroundColor: Colors.transparent,
        body: Stack(
          children: [
            Container(),
            Container(
              padding: EdgeInsets.only(left: 35, top: 100),
              child: Text(
                'Welcome\nBack',
                style: TextStyle(color: Colors.white, fontSize: 40),
              ),
            ),
            SingleChildScrollView(
              child: Container(
                padding: EdgeInsets.only(
                    top: MediaQuery.of(context).size.height * 0.4),
                child: Column(
                  crossAxisAlignment: CrossAxisAlignment.start,
                  children: [
                    Container(
                      margin: EdgeInsets.only(left: 35, right: 35),
                      child: Column(
                        children: [
                          TextField(
                            style: TextStyle(color: Colors.black),
                            decoration: InputDecoration(
                                fillColor: Colors.grey.shade100,
                                filled: true,
                                hintText: "Please Enter Email",
                                border: OutlineInputBorder(
                                  borderRadius: BorderRadius.circular(16),
                                )),
                          ),
                          SizedBox(
                            height: 30,
                          ),
                          TextField(
                            style: TextStyle(),
                            obscureText: true,
                            decoration: InputDecoration(
                                fillColor: Colors.grey.shade100,
                                filled: true,
                                hintText: "Please Enter Password",
                                border: OutlineInputBorder(
                                  borderRadius: BorderRadius.circular(16),
                                )),
                          ),
                          SizedBox(
                            height: 10,
                          ),
                          TextButton(
                              onPressed: () {},
                              child: Text(
                                'Forgot Password',
                                style: TextStyle(
                                  decoration: TextDecoration.underline,
                                  color: Colors.white,
                                  fontSize: 20,
                                ),
                              )),
                          SizedBox(
                            height: 20,
                          ),
                          Row(
                            mainAxisAlignment: MainAxisAlignment.spaceBetween,
                            children: [
                              Text(
                                'Sign in',
                                style: TextStyle(
                                    fontSize: 27,
                                    fontWeight: FontWeight.w700,
                                    color: Colors.white),
                              ),
                              CircleAvatar(
                                radius: 30,
                                backgroundColor: Colors.grey,
                                child: IconButton(
                                    color: Colors.white,
                                    onPressed: () {},
                                    icon: Icon(
                                      Icons.arrow_forward,
                                    )),
                              )
                            ],
                          ),
                          SizedBox(
                            height: 20,
                          ),

                          Row(
                            mainAxisAlignment: MainAxisAlignment.center,
                            children: [
                              Text(
                                "Don't have an account?",
                                style: TextStyle(fontSize: 20,color: Colors.white),
                              ),
                              GestureDetector(
                                onTap: () {
                                  Navigator.pushReplacement(
                                      context,
                                      MaterialPageRoute(
                                        builder: (context) =>
                                            RegisterPage(),
                                      ));
                                },
                                child: Text(
                                  " Sign Up",
                                  style:
                                  TextStyle(fontSize: 25, color: Colors.cyan),
                                ),
                              ),
                            ],
                          ),

                        ],
                      ),
                    )
                  ],
                ),
              ),
            ),
          ],
        ),
      ),
    );
  }
}
RegisterPage.dart
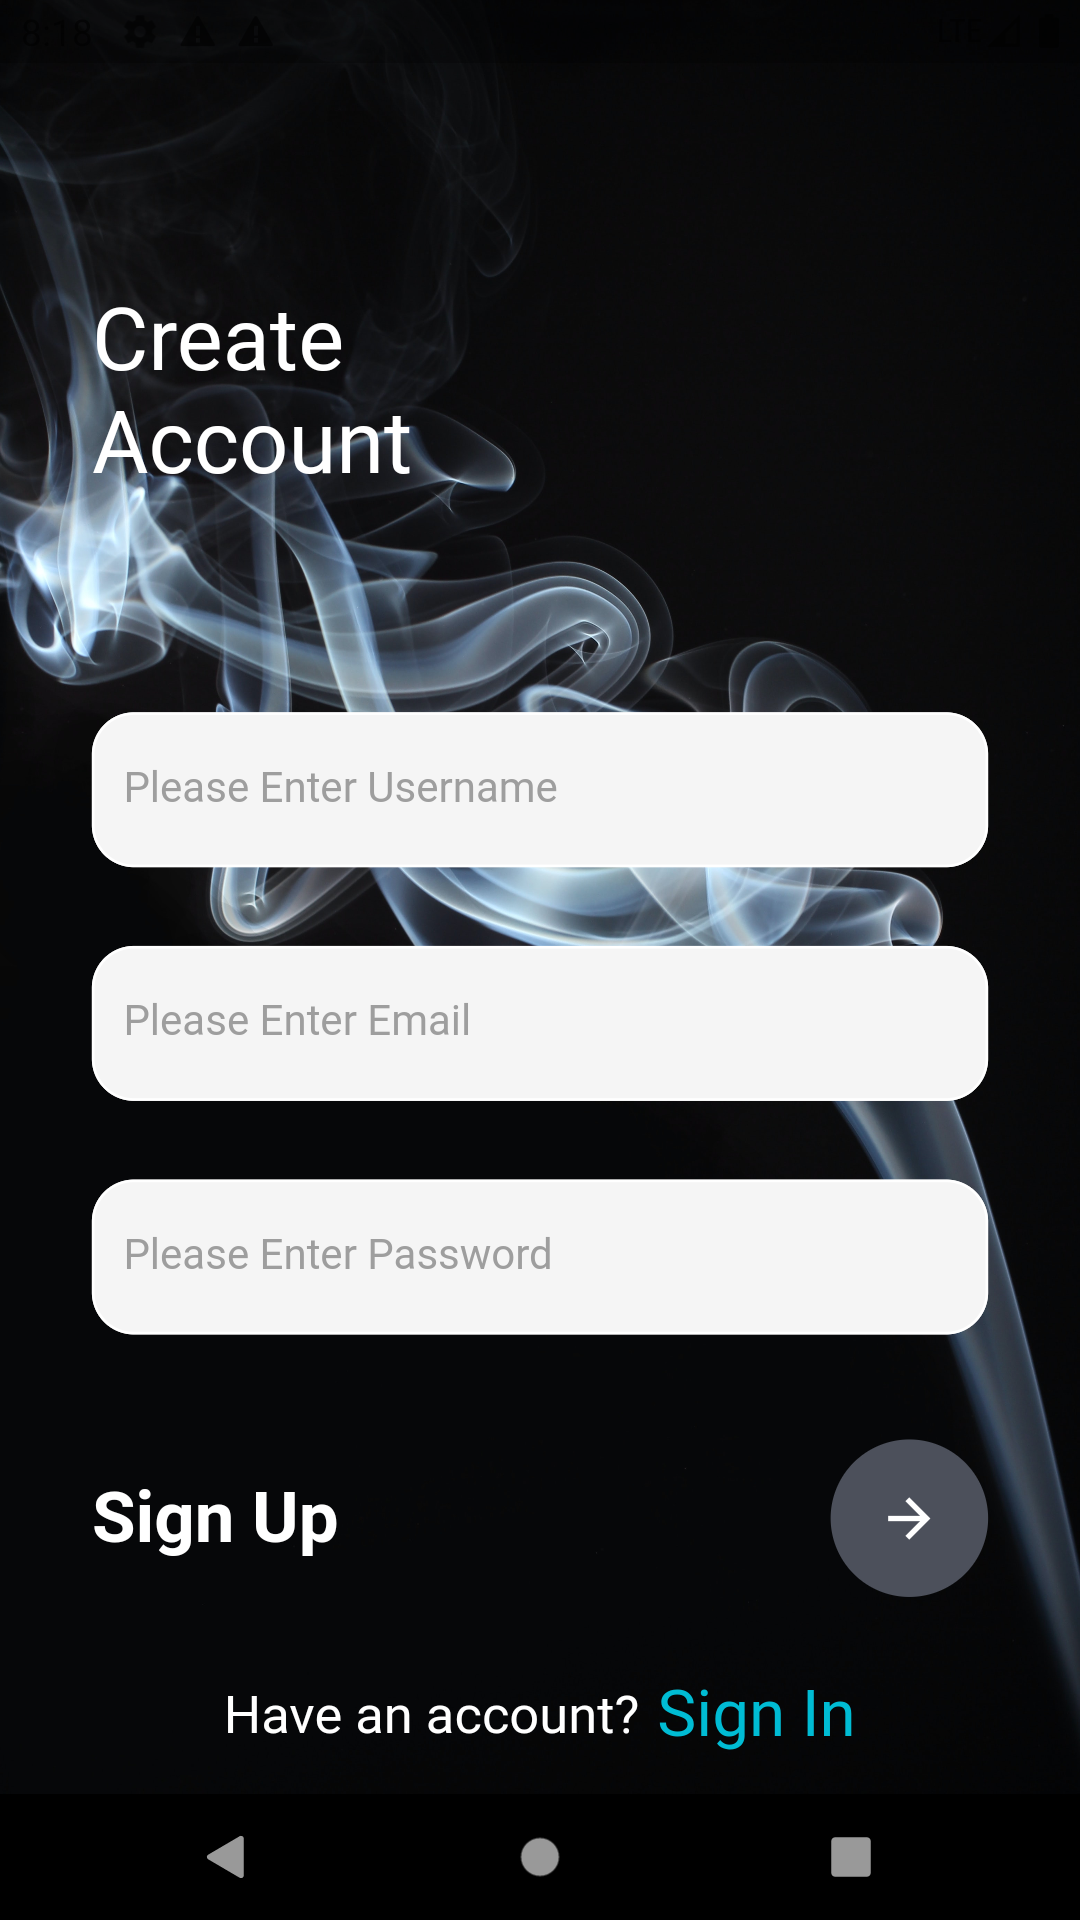
This blog shares insights into the register page that's being built with Flutter. The register page will allow users to enter their username, email and password to authenticate before accessing the app.
import 'package:flutter/material.dart';
import 'package:loginuicolors/login.dart';

class RegisterPage extends StatefulWidget {
  const RegisterPage({Key? key}) : super(key: key);

  @override
  _RegisterPageState createState() => _RegisterPageState();
}

class _RegisterPageState extends State {
  @override
  Widget build(BuildContext context) {
    return Container(
      decoration: BoxDecoration(
        image: DecorationImage(
            image: AssetImage('assets/lg.jpg'), fit: BoxFit.cover),
      ),
      child: Scaffold(
        backgroundColor: Colors.transparent,
        appBar: AppBar(
          backgroundColor: Colors.transparent,
          elevation: 0,
        ),
        body: Stack(
          children: [
            Container(
              padding: EdgeInsets.only(left: 35, top: 30),
              child: Text(
                'Create\nAccount',
                style: TextStyle(color: Colors.white, fontSize: 33),
              ),
            ),
            SingleChildScrollView(
              child: Container(
                padding: EdgeInsets.only(
                    top: MediaQuery.of(context).size.height * 0.28),
                child: Column(
                  crossAxisAlignment: CrossAxisAlignment.start,
                  children: [
                    Container(
                      margin: EdgeInsets.only(left: 35, right: 35),
                      child: Column(
                        children: [
                          TextField(
                            style: TextStyle(color: Colors.black),
                            decoration: InputDecoration(
                                fillColor: Colors.grey.shade100,
                                filled: true,
                                enabledBorder: OutlineInputBorder(
                                  borderRadius: BorderRadius.circular(16),
                                  borderSide: BorderSide(
                                    color: Colors.white,
                                  ),
                                ),
                                focusedBorder: OutlineInputBorder(
                                  borderRadius: BorderRadius.circular(16),
                                  borderSide: BorderSide(
                                    color: Colors.green,
                                  ),
                                ),
                                hintText: "Please Enter Username",
                                hintStyle: TextStyle(color: Colors.grey),
                                border: OutlineInputBorder(
                                  borderRadius: BorderRadius.circular(16),
                                )),
                          ),
                          SizedBox(
                            height: 30,
                          ),
                          TextField(
                            style: TextStyle(color: Colors.black),
                            decoration: InputDecoration(
                                fillColor: Colors.grey.shade100,
                                filled: true,
                                enabledBorder: OutlineInputBorder(
                                  borderRadius: BorderRadius.circular(16),
                                  borderSide: BorderSide(
                                    color: Colors.white,
                                  ),
                                ),
                                focusedBorder: OutlineInputBorder(
                                  borderRadius: BorderRadius.circular(16),
                                  borderSide: BorderSide(
                                    color: Colors.green,
                                  ),
                                ),
                                hintText: "Please Enter Email",
                                hintStyle: TextStyle(color: Colors.grey),
                                border: OutlineInputBorder(
                                  borderRadius: BorderRadius.circular(16),
                                )),
                          ),
                          SizedBox(
                            height: 30,
                          ),
                          TextField(
                            style: TextStyle(color: Colors.black),
                            obscureText: true,
                            decoration: InputDecoration(
                                fillColor: Colors.grey.shade100,
                                filled: true,
                                enabledBorder: OutlineInputBorder(
                                  borderRadius: BorderRadius.circular(16),
                                  borderSide: BorderSide(
                                    color: Colors.white,
                                  ),
                                ),
                                focusedBorder: OutlineInputBorder(
                                  borderRadius: BorderRadius.circular(16),
                                  borderSide: BorderSide(
                                    color: Colors.green,
                                  ),
                                ),
                                hintText: "Please Enter Password",
                                hintStyle: TextStyle(color: Colors.grey),
                                border: OutlineInputBorder(
                                  borderRadius: BorderRadius.circular(16),
                                )),
                          ),
                          SizedBox(
                            height: 40,
                          ),
                          Row(
                            mainAxisAlignment: MainAxisAlignment.spaceBetween,
                            children: [
                              Text(
                                'Sign Up',
                                style: TextStyle(
                                    color: Colors.white,
                                    fontSize: 27,
                                    fontWeight: FontWeight.w700),
                              ),
                              CircleAvatar(
                                radius: 30,
                                backgroundColor: Color(0xff4c505b),
                                child: IconButton(
                                    color: Colors.white,
                                    onPressed: () {},
                                    icon: Icon(
                                      Icons.arrow_forward,
                                    )),
                              )
                            ],
                          ),
                          SizedBox(
                            height: 30,
                          ),
                          Row(
                            mainAxisAlignment: MainAxisAlignment.center,
                            children: [
                              Text(
                                "Have an account?",
                                style: TextStyle(
                                  fontSize: 20,
                                  color: Colors.white
                                ),
                              ),
                              GestureDetector(
                                onTap: () {
                                  Navigator.pushReplacement(
                                      context,
                                      MaterialPageRoute(
                                        builder: (context) => LoginPage(),
                                      ));
                                },
                                child: Text(
                                  " Sign In",
                                  style: TextStyle(
                                    fontSize: 25,
                                    color: Colors.cyan,
                                  ),
                                ),
                              ),
                            ],
                          ),
                        ],
                      ),
                    )
                  ],
                ),
              ),
            ),
          ],
        ),
      ),
    );
  }
}
We covered how to create a login and register ui in Flutter with several components. We'll take a look at how to build the login screen with a few extra components to make it more interactive.
Thank you for reading my blog! If you enjoyed it, please share it with your friends and family on social media!
OUTPUT
 |
| Create Flutter Login and Register Ui Tutorial. |
 |
| Create Flutter Login and Register Ui Tutorial. |


.png)


0 Comments
Please Do Not Comments Any Span Or Span link..